A couple of days ago, I found a cool Angular WebXR Art Sample application on Google Gemini GitHub. The application was built using vanilla THREE.js. I thought it would be a good idea to convert it to Angular Three (i.e: angular-three), a library that provides a custom Angular Renderer to render THREE.js entities. This way, I can leverage Angular’s features and improve the developer experience when writing 3D applications with Angular.
In this blog post, I will walk you through the steps I took to convert the Angular WebXR Art Sample application to Angular Three. That said, I only focus on the THREE.js conversion process. I won’t cover the WebXR nor the Gemini part of the application.
Additionally, I would like to refer you to the Angular Three with AnalogJS and Astro for an introduction to Angular Three
The example entry point
Before diving into the conversion process, let’s understand the Angular WebXR Art Sample application entry point: MuseumComponent
1@defer (prefetch on idle) {2 <art-gallery [artworks]="artworks()" />3} @placeholder ( minimum 5s) {4 <art-loading></art-loading>5} @error {6 <p>Failed to load the gallery</p>7}We can see that there are two branches in the application: art-gallery and art-loading. The art-gallery branch is where the 3D models are rendered, and the art-loading branch is a placeholder for the spinning Angular logo.
 Animated gif of the Angular WebXR application
Both art-gallery and art-loading wrap a canvas element where the scene graph is rendered to. Both GalleryComponent and LoadingComponent extend SceneComponent which sets up the required building blocks for a THREE.js application:
- A
Scene - A
Camera, more specifically aPerspectiveCamera - A
Renderer, more specifically aWebGLRenderer
1export class SceneComponent {2  /* more code */3
4  ngAfterViewInit() {5    const canvasEl = this.canvas().nativeElement;6
7    /* more code */8
9    // Scene background10    this.scene.background = new Color("black");11    this.scene.backgroundBlurriness = 0.3;12
13    // Camera14    this.camera = new PerspectiveCamera(45, w / h, 0.1, 500);15    this.camera.position.set(0, 1.6, 0);16    this.scene.add(this.camera);17
18    // Renderer19    this.renderer = new WebGLRenderer({20      canvas: canvasEl,21      antialias: true,22      powerPreference: "high-performance",23      alpha: true,24    });25    /* more code */26  }27
28  /* more code */29}
In addition, the SceneComponent also sets up some lights and an OrbitControls for the camera. The OrbitControls allows the user to rotate the camera around the scene.
1export class SceneComponent {2  /* more code */3
4    ngAfterViewInit() {5      /* setup code */6
7      // add lights8      this.addLights();9
10      // add controls11      this.addControls();12    }13
14    /* more code */15
16}1// Camera Lights2const cameraLight: any = this.lightsService.createSpotLight();3cameraLight.position.set( 0, -2, 0.64 );4this.camera.add( cameraLight );5
6// Ambient Light7const ambient = new HemisphereLight( 0xffffff, 0xbbbbff, 0.5 );8this.scene.add( ambient );1this.controls = new OrbitControls( this.camera, this.renderer.domElement );2this.controls.listenToKeyEvents( window ); // optional3
4// Set the controls target to the camera/user position5this.controls.target.set( 0, 1.6, -5 );6this.controls.enableDamping = true; // an animation loop is required when either damping or auto-rotation are enabled7this.controls.dampingFactor = 0.05;8this.controls.enableZoom = true;9
10this.controls.screenSpacePanning = false;11
12this.controls.minDistance = 5;13this.controls.maxDistance = 60;14this.controls.maxPolarAngle = Math.PI / 2 - 0.05; // prevent camera below ground15this.controls.minPolarAngle = Math.PI / 4; // prevent top down view16this.controls.update();I will not try to explain the code line-by-line here but the gist is that it is imperative code that sets up the base environment for the scene graph. For me personally, this code is hard to follow and maintain.
Here is the same branched template in the Angular Three rewrite:
1import { ChangeDetectionStrategy, Component } from '@angular/core'2import { GalleryScene } from './gallery-scene.component'3import { LoadingScene } from './loading-scene.component'4import { MuseumCanvas } from './museum-canvas.component'5
6@Component({7  standalone: true,8  template: `9    @defer (prefetch on idle) {10      <app-museum-canvas [scene]="galleryScene" />11    } @placeholder (minimum 5s) {12      <app-museum-canvas [scene]="loadingScene" />13    }14  `,15    /* truncated */16  imports: [MuseumCanvas],17})18export default class GalleryPage {19  galleryScene = GalleryScene20  loadingScene = LoadingScene21}
In this version, MuseumCanvas is the component that is responsible for setting up the required building blocks of a 3D scene graph.
1import { ChangeDetectionStrategy, Component, input, type Type } from '@angular/core'2import { NgtCanvas } from 'angular-three'3import { NgtsLoader } from 'angular-three-soba/loaders'4import * as THREE from 'three'5
6@Component({7  selector: 'app-museum-canvas',8  standalone: true,9  template: `10    <ngt-canvas11      [sceneGraph]="scene()"12      [scene]="sceneOptions"13      [camera]="$any(cameraOptions)"14      [gl]="glOptions"15      [shadows]="true"16    />17    <ngts-loader />18  `,19  changeDetection: ChangeDetectionStrategy.OnPush,20  imports: [NgtCanvas, NgtsLoader],21})22export class MuseumCanvas {23  scene = input.required<Type<any>>()24
25  protected sceneOptions = {26    background: new THREE.Color('black'),27    backgroundBlurriness: 0.3,28  }29
30  protected cameraOptions = {31    position: [0, 1.6, 0],32    fov: 45,33    near: 0.1,34    far: 500,35  }36
37  protected glOptions = {38    toneMappingExposure: 1.5,39    // NOTE: Uncomment the following line to enable WebXR40    // xr: {41    //     enabled: true42    // }43  }44}
The highlighted code shows the MuseumCanvas accepts a scene Input that is passed into the NgtCanvas component which will render the scene with the Custom Renderer.
Alright, so that takes care of the Renderer, Scene, and Camera. What about the OrbitControls and the lights?
Since we are using Angular Three, we can leverage the declarative approach with the Angular Template to build our reusable Lights and Controls components
1import { ChangeDetectionStrategy, Component, CUSTOM_ELEMENTS_SCHEMA, effect } from '@angular/core'2import { extend, injectNgtStore } from 'angular-three'3import { HemisphereLight, SpotLight } from 'three'4
5extend({ HemisphereLight })6
7@Component({8  selector: 'app-lights',9  standalone: true,10  template: `11    <ngt-hemisphere-light skyColor="#ffffff" groundColor="#bbbbff" [intensity]="0.5" />12  `,13  changeDetection: ChangeDetectionStrategy.OnPush,14  schemas: [CUSTOM_ELEMENTS_SCHEMA],15})16export class Lights {17  protected Math = Math18
19  private store = injectNgtStore()20  private camera = this.store.select('camera')21  private scene = this.store.select('scene')22
23  constructor() {24    effect(() => {25      const [camera, scene] = [this.camera(), this.scene()]26      if (!camera || !scene) return27
28 const spotLight = new SpotLight(0xffffff, 30, 30, Math.PI / 4, 0.5)29 spotLight.position.set(0, -2, 0.64)30 camera.add(spotLight)31 scene.add(camera)32 })33 }34}1import { ChangeDetectionStrategy, Component, CUSTOM_ELEMENTS_SCHEMA, input } from '@angular/core'2import { injectNgtRef } from 'angular-three'3import { NgtsOrbitControls } from 'angular-three-soba/controls'4import { OrbitControls } from 'three-stdlib'5
6@Component({7 selector: 'app-controls',8 standalone: true,9 template: `10 <ngts-orbit-controls11 [controlsRef]="controlsRef()"12 [target]="[0, 1.6, -5]"13 [dampingFactor]="0.05"14 [enableZoom]="true"15 [screenSpacePanning]="false"16 [minDistance]="5"17 [maxDistance]="60"18 [maxPolarAngle]="Math.PI / 2 - 0.05"19 [minPolarAngle]="Math.PI / 4"20 />21 `,22 changeDetection: ChangeDetectionStrategy.OnPush,23 imports: [NgtsOrbitControls],24 schemas: [CUSTOM_ELEMENTS_SCHEMA],25})26export class Controls {27 protected Math = Math28 controlsRef = input(injectNgtRef<OrbitControls>())29}1// Camera Lights2const cameraLight: any = this.lightsService.createSpotLight();3cameraLight.position.set( 0, -2, 0.64 );4this.camera.add( cameraLight );5
6// Ambient Light7const ambient = new HemisphereLight( 0xffffff, 0xbbbbff, 0.5 );8this.scene.add( ambient );1this.controls = new OrbitControls( this.camera, this.renderer.domElement );2this.controls.listenToKeyEvents( window ); // optional3
4// Set the controls target to the camera/user position5this.controls.target.set( 0, 1.6, -5 );6this.controls.enableDamping = true; // an animation loop is required when either damping or auto-rotation are enabled7this.controls.dampingFactor = 0.05;8this.controls.enableZoom = true;9
10this.controls.screenSpacePanning = false;11
12this.controls.minDistance = 5;13this.controls.maxDistance = 60;14this.controls.maxPolarAngle = Math.PI / 2 - 0.05; // prevent camera below ground15this.controls.minPolarAngle = Math.PI / 4; // prevent top down view16this.controls.update();If we count the line of code in both approaches, the imperative approach seems to have less code but the declarative approach is more composable where we can drop <app-lights /> and/or <app-controls /> in any Scene graph component to have the default lighting and an OrbitControls.
The loading Angular Logo
The loading Angular logo is a placeholder for the art-loading branch. In the Angular WebXR Art Sample application, the loading Angular logo is a spinning Angular logo. In the Angular Three rewrite, we use the LoadingScene component to render the spinning Angular logo.
1// inheritance from SceneComponent2export class LoadingComponent extends SceneComponent {3  /* more code */4
5  override ngAfterViewInit (): void {6    // sets up the building blocks7    super.ngAfterViewInit();8
9    // Load the logo10    const model = this.loadersService.loadGLTF( {11      path: '/assets/models/aLogo.glb',12      // callback when the model is loaded13      onLoadCB: this.onLoad.bind( this ),14    } );15
16    // create additional light for the loading scene17    this.createLight();18
19  };20
21  createLight () {22    /* view tab */23  }24
25  // Place and animate the logo when loaded26  onLoad ( model: Object3D ) {27    /* view tab */28  }29
30 animate () {31 /* view tab */32 }33}1// create a Mesh imperatively with THREE.js2this.particleLight = new Mesh(3 new SphereGeometry( .05, 8, 8 ),4 new MeshBasicMaterial( { color: 0xffffff } )5);6// add the Mesh to the scene7this.scene.add( this.particleLight );8// create a PointLight imperatively with THREE.js9const pointLight = new PointLight( 0xffffff, 30 );10// add the PointLight to the Mesh11this.particleLight.add( pointLight );12// set the rotation of the PointLight13pointLight.rotation.x = -Math.PI / 2;14// set the position of the PointLight15this.particleLight.position.z = -90;16this.scene.add( this.particleLight );17
18// add the animate function to participate in the render loop19this.addToRender( this.animate.bind( this ) );1// set the position of the model2model.position.z = -100;3model.position.y = 13;4model.name = 'aLogo';5// add the model to the scene6this.addToScene( model );7// add the animate function to participate in the render loop8this.addToRender( () => {9 model.rotation.y += 0.01;10} );11this.controls.enabled = false;1const timer = Date.now() * 0.00025;2this.particleLight.position.x = Math.sin( timer * 7 ) * 3;3this.particleLight.position.y = Math.cos( timer * 5 ) * 4;4this.particleLight.position.z = Math.cos( timer * 3 ) * 3;Once again, LoadingComponent inherits the setup from SceneComponent and adds on top of it. It is not apparent how the LoadingComponent contributes to the Scene graph.
Here’s the Angular Three rewrite:
1import { ChangeDetectionStrategy, Component, computed, CUSTOM_ELEMENTS_SCHEMA } from '@angular/core'2import { extend, injectNgtRef, NgtArgs } from 'angular-three'3import { injectNgtsGLTFLoader } from 'angular-three-soba/loaders'4import { Mesh, PointLight, SphereGeometry, type Object3D } from 'three'5import type { OrbitControls } from 'three-stdlib'6import { Controls } from './controls.component'7import { Lights } from './lights.component'8
9extend({ Mesh, SphereGeometry, PointLight })10
11@Component({12  standalone: true,13  template: `14    <!-- addLights -->15    <app-lights />16
17    <!-- addControls -->18    <app-controls [controlsRef]="controlsRef" />19
20    <!-- angular logo model -->21    <ngt-primitive *args="[model()]" [position]="[0, 13, -100]" (beforeRender)="onBeforeRender($any($event).object)" />22
23    <!-- particle light -->24    <ngt-mesh [position]="[0, 0, -90]" (beforeRender)="onParticleLightBeforeRender($any($event).object)">25      <ngt-sphere-geometry *args="[0.05, 8, 8]" />26      <ngt-point-light [intensity]="30" [rotation]="[-Math.PI / 2, 0, 0]" />27    </ngt-mesh>28  `,29  changeDetection: ChangeDetectionStrategy.OnPush,30  schemas: [CUSTOM_ELEMENTS_SCHEMA],31  imports: [NgtArgs, Lights, Controls],32})33export class LoadingScene {34  protected Math = Math35
36  protected controlsRef = injectNgtRef<OrbitControls>()37
38  private gltf = injectNgtsGLTFLoader(() => 'models/aLogo.glb')39  protected model = computed(() => {40    const gltf = this.gltf()41    if (!gltf) return null42    this.controlsRef.nativeElement.enabled = false43    return gltf.scene44  })45
46  onBeforeRender(object: Object3D) {47    object.rotation.y += 0.0148  }49
50  onParticleLightBeforeRender(object: Mesh) {51    const timer = Date.now() * 0.0002552    object.position.x = Math.sin(timer * 7) * 353    object.position.y = Math.cos(timer * 5) * 454    object.position.z = Math.cos(timer * 3) * 355  }56}
This version is actually so easy to follow that I will explain piece by piece:
- The
LoadingSceneadds theLightsandControlscomponents to the scene by dropping<app-lights />and<app-controls />to the template. - For the model, we use
injectNgtsGLTFLoader()in combination with<ngt-primitive>special element from Angular Three to display the model. We can apply any properties to the underlyingObject3Dfrom the external model by using Property Binding on the template.- We can use
(beforeRender)custom event to allow the Object to participate in the render loop.
- We can use
- For the particle light, we, once again, use the template by leveraging the
<ngt-mesh>element to create theMesh.- As the content child for the
Mesh, we usengt-point-lightto create thePointLight - The particle light also participates in the render loop so we use
(beforeRender)custom event to animate the light.
- As the content child for the
The Gallery
The GalleryComponent is similar to LoadingComponent in a sense that it also extends SceneComponent.
1export class GalleryComponent extends SceneComponent {2  /* more code */3
4  override ngAfterViewInit (): void {5
6    super.ngAfterViewInit();7
8    // Focus frame9    this.createFrames();10
11    // Environment12    this.createEnv();13
14  };15
16  createFrames () {17    /* will discuss later */18  }19
20  createEnv () {21    /* will discuss later */22  }23
24  /* more code */25};
The difference is GalleryComponent creates the Frames for the artworks and creates its own environment on top of the base environment (i.e: lights)
We’ll be looking at the createEnv() method in the GalleryComponent that sets up the environment for the gallery. More specifically,
we’ll look at addCornerLights() and the two callbacks onModelLoaded() and onLoadWallsLoaded().
1export class GalleryComponent extends SceneComponent {2  /* more code */3  createEnv () {4
5    // Lights6    this.addCornerLights();7
8    // Add Models9    // Model for Floor10    const model = this.loadersService.loadGLTF( {11      path: "assets/models/floorModel.glb",12      onLoadCB: ( model: Object3D<Object3DEventMap> ) => {13        this.onModelLoaded( model );14      },15    } );16
17    // Model for Walls18    const modelWalls = this.loadersService.loadGLTF( {19      path: "assets/models/galleryInnerWalls.glb",20      onLoadCB: ( model: Object3D<Object3DEventMap> ) => {21        this.onLoadWallsLoaded( model );22      },23    } );24
25  }26
27  /* more code */28}
GalleryComponent adds 3 PointLight to the scene to create a corner light effect.
1// Corner lights in each inner walls2const pointLight = new PointLight( 0xffffff, Math.PI, 13, 1 );3pointLight.position.y = 3.2;4pointLight.position.z = -10;5
6const pointLight1 = pointLight.clone();7pointLight1.position.set( 10, 3.2, 7.6 );8
9const pointLight2 = pointLight.clone();10pointLight2.position.set( -10, 3.2, 7.6 );11this.scene.add( pointLight, pointLight1, pointLight2 );
Once we load the model, we’ll create a MeshPhysicalMaterial for every Object3D in the model itself. However, if the Object3D is the floor, we’ll create a MeshStandardMaterial for it with additional textures.
1let meshesCount = 0;2let material: Material = this.materialsService.createMeshPhysicalMaterial();3
4model.position.z = -0;5model.scale.set( 3, 3, 3 );6model.traverse( ( obj: any ) => {7
8  if ( obj.isMesh ) {9    meshesCount += 1;10    if ( obj.name == 'Floor' ) {11      material = this.materialsService.createFloorMaterial();12    }13
14    obj.material = material;15
16    obj.castShadow = true;17    obj.receiveShadow = true;18    obj.castShadow = true;19    obj.receiveShadow = true;20
21    if ( obj.material.map ) { obj.material.map.anisotropy = 16; }22  }23
24} );25
26this.addToScene( model );
We load 3 different files for 3 different textures to apply to the Floor’s material.
1const floorMat = new MeshStandardMaterial( {2  roughness: 0.8,3  color: 0xffffff,4  metalness: 0.2,5  bumpScale: 0.00056} );7
8// Diffuse9this.loadersService.textureLoader.load( 'assets/textures/hardwood_diffuse.jpg', ( map ) => {10  map.wrapS = RepeatWrapping;11  map.wrapT = RepeatWrapping;12  map.anisotropy = 16;13  map.repeat.set( 10, 24 );14  map.colorSpace = SRGBColorSpace;15  floorMat.map = map;16  floorMat.needsUpdate = true;17},18  undefined,19  // onError callback20  function ( err ) {21    console.error( 'Bump texture failed to load.' );22
23  }24);25
26this.loadersService.textureLoader.load( 'assets/textures/hardwood_bump.jpg', function ( map ) {27
28  map.wrapS = RepeatWrapping;29  map.wrapT = RepeatWrapping;30  map.anisotropy = 4;31  map.repeat.set( 10, 24 );32  floorMat.bumpMap = map;33  floorMat.needsUpdate = true;34
35},36  undefined,37  // onError callback38  function ( err ) {39    console.error( 'Bump texture failed to load.' );40
41  } );42
43this.loadersService.textureLoader.load( 'assets/textures/hardwood_roughness.jpg', function ( map ) {44
45  map.wrapS = RepeatWrapping;46  map.wrapT = RepeatWrapping;47  map.anisotropy = 4;48  map.repeat.set( 10, 24 );49  floorMat.roughnessMap = map;50  floorMat.needsUpdate = true;51
52},53  undefined,54  // onError callback55  function ( err ) {56    console.error( 'Bump texture failed to load.' );57
58  }59);60
61return floorMat;
For the walls, we just set the position and scale of the model.
1model.position.z = -0;2model.scale.set( 3, 3, 3 );3
4this.addToScene( model );
As you can see here, the imperativeness is an ongoing theme for vanilla THREE.js application development. The GalleryComponent is no exception. The createEnv() method is a mix of setting up the environment, loading models, and setting up materials for the models.
Here’s the Angular Three rewrite:
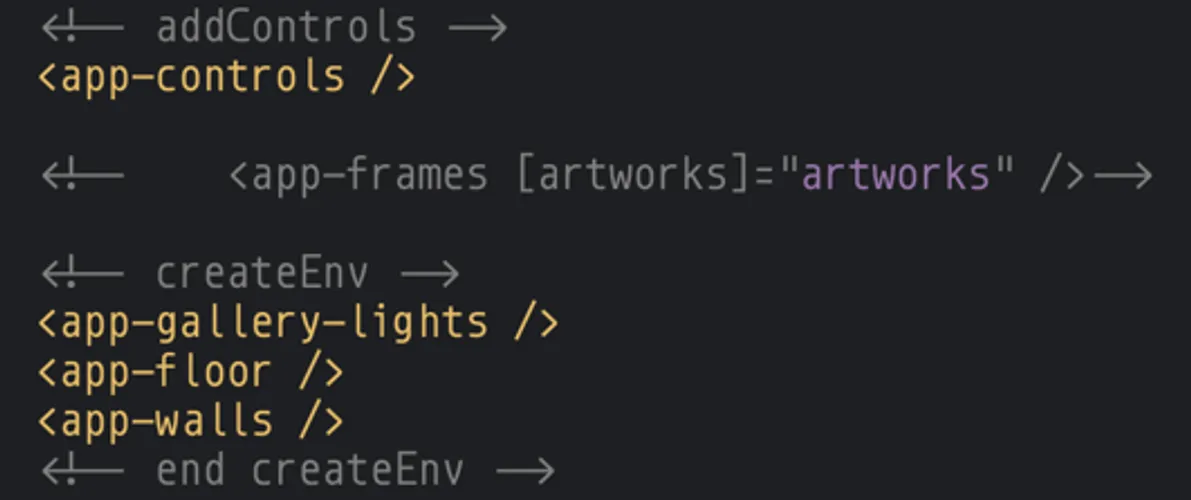
1import { ChangeDetectionStrategy, Component } from '@angular/core'2import { ARTWORKS } from '../artworks'3import { Controls } from './controls.component'4import { Floor } from './floor.component'5import { Frames } from './frames.component'6import { GalleryLights } from './gallery-lights.component'7import { Walls } from './walls.component'8
9@Component({10  standalone: true,11  template: `12    <!-- addControls -->13    <app-controls />14
15    <app-frames [artworks]="artworks" />16
17    <!-- createEnv -->18    <app-gallery-lights />19    <app-floor />20    <app-walls />21    <!-- end createEnv -->22  `,23  changeDetection: ChangeDetectionStrategy.OnPush,24  host: { class: 'experience' },25  imports: [Controls, Frames, Floor, Walls, GalleryLights],26})27export class GalleryScene {28  protected artworks = ARTWORKS29}
First off, we compose <app-controls /> to set up the OrbitControls. We’ll skip <app-frames /> for now and focus on the createEnv part. We drop <app-gallery-lights />, <app-floor />, and <app-walls /> to the template to set up the additional lights, the floor, and the walls. It is already a lot clearer to see what the GalleryScene is doing.
Composition is the key here once again. We compose <app-lights /> (1) to set up the default lights then add 3 PointLight to the scene to create a corner light effect. Since we operate on the template, we can leverage control flow like @for to create the corner lights based on the predefined corner positions (2).
1import { ChangeDetectionStrategy, Component, CUSTOM_ELEMENTS_SCHEMA } from '@angular/core'2import { extend } from 'angular-three'3import { PointLight } from 'three'4import { Lights } from './lights.component'5
6extend({ PointLight })7
8@Component({9  selector: 'app-gallery-lights',10  standalone: true,11  template: `12    <!-- addLights -->13    <app-lights />14
15    <!-- addCornerLights -->16    @for (position of lightPositions; track $index) {17      <ngt-point-light [intensity]="Math.PI" [distance]="13" [decay]="1" [position]="position" />18    }19  `,20  changeDetection: ChangeDetectionStrategy.OnPush,21  schemas: [CUSTOM_ELEMENTS_SCHEMA],22  imports: [Lights],23})24export class GalleryLights {25  protected Math = Math26  protected lightPositions = [27    [0, 3.2, -10],28    [10, 3.2, 7.6],29    [-10, 3.2, 7.6],30  ]31}
For the floor, we use ngt-primitive in combination with injectNgtsGLTFLoader(). Interestingly, we also use injectNgtsTextureLoader() to load a dictionary of textures for the floor. We then apply the textures to the MeshStandardMaterial for the floor.
1import { ChangeDetectionStrategy, Component, computed, CUSTOM_ELEMENTS_SCHEMA } from '@angular/core'2import { checkUpdate, NgtArgs } from 'angular-three'3import { injectNgtsGLTFLoader, injectNgtsTextureLoader } from 'angular-three-soba/loaders'4import { MeshPhysicalMaterial, MeshStandardMaterial, RepeatWrapping, SRGBColorSpace, type Mesh } from 'three'5
6@Component({7  selector: 'app-floor',8  standalone: true,9  template: `10    <ngt-primitive *args="[model()]" />11  `,12  imports: [NgtArgs],13  schemas: [CUSTOM_ELEMENTS_SCHEMA],14  changeDetection: ChangeDetectionStrategy.OnPush,15})16export class Floor {17  private gltf = injectNgtsGLTFLoader(() => 'models/floorModel.glb')18  private textures = injectNgtsTextureLoader(() => ({19    diffuse: 'textures/hardwood_diffuse.jpg',20    bump: 'textures/hardwood_bump.jpg',21    roughness: 'textures/hardwood_roughness.jpg',22  }))23
24  protected model = computed(() => {25    const [gltf, textures] = [this.gltf(), this.textures()]26    if (!gltf || !textures) return null27    const { diffuse, roughness, bump } = textures28    const scene = gltf.scene29
30    let material: MeshStandardMaterial | MeshPhysicalMaterial = new MeshPhysicalMaterial({31      // clearcoat: 0,32      clearcoatRoughness: 0.1,33      // metalness: 0,34      roughness: 0.9,35      color: 0x54001b, // Teal: 0x004a54,36      // normalScale: new Vector2(0.15, 0.15)37    })38
39    scene.position.z = -040    scene.scale.setScalar(3)41
42    scene.traverse((obj) => {43      if ((obj as Mesh).isMesh) {44        if (obj.name === 'Floor') {45          // Diffuse46          diffuse.wrapS = RepeatWrapping47          diffuse.wrapT = RepeatWrapping48          diffuse.anisotropy = 1649          diffuse.repeat.set(10, 24)50          diffuse.colorSpace = SRGBColorSpace51          checkUpdate(diffuse)52
53          // bump54          bump.wrapS = RepeatWrapping55          bump.wrapT = RepeatWrapping56          bump.anisotropy = 457          bump.repeat.set(10, 24)58          checkUpdate(bump)59
60          // roughness61          roughness.wrapS = RepeatWrapping62          roughness.wrapT = RepeatWrapping63          roughness.anisotropy = 464          roughness.repeat.set(10, 24)65          checkUpdate(roughness)66
67          material = new MeshStandardMaterial({68            roughness: 0.8,69            color: 0xffffff,70            metalness: 0.2,71            bumpScale: 0.0005,72            map: diffuse,73            bumpMap: bump,74            roughnessMap: roughness,75          })76        }77
78        ;(obj as Mesh).material = material79        obj.castShadow = true80        obj.receiveShadow = true81
82        if (((obj as Mesh).material as MeshPhysicalMaterial).map) {83          ;((obj as Mesh).material as MeshPhysicalMaterial).map!.anisotropy = 1684        }85      }86    })87
88    return scene89  })90}
The walls is straightforward with ngt-primitive and injectNgtsGLTFLoader()
1import { ChangeDetectionStrategy, Component, computed, CUSTOM_ELEMENTS_SCHEMA } from '@angular/core'2import { NgtArgs } from 'angular-three'3import { injectNgtsGLTFLoader } from 'angular-three-soba/loaders'4
5@Component({6 selector: 'app-walls',7 standalone: true,8 template: `9 <ngt-primitive *args="[model()]" />10 `,11 schemas: [CUSTOM_ELEMENTS_SCHEMA],12 changeDetection: ChangeDetectionStrategy.OnPush,13 imports: [NgtArgs],14})15export class Walls {16 private gltf = injectNgtsGLTFLoader(() => 'models/galleryInnerWalls.glb')17 protected model = computed(() => {18 const gltf = this.gltf()19 if (!gltf) return null20
21 const scene = gltf.scene22
23 scene.scale.setScalar(3)24
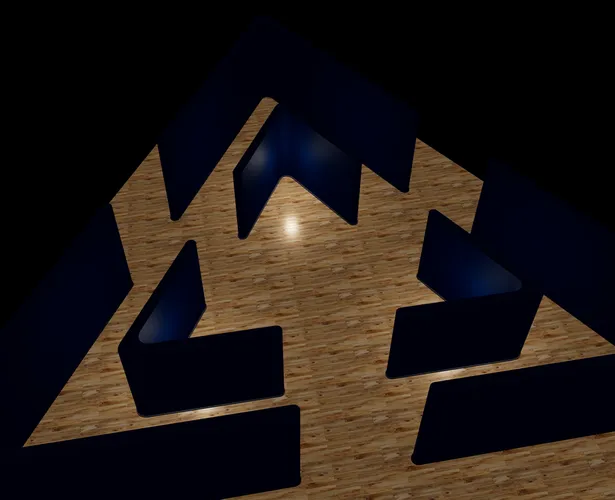
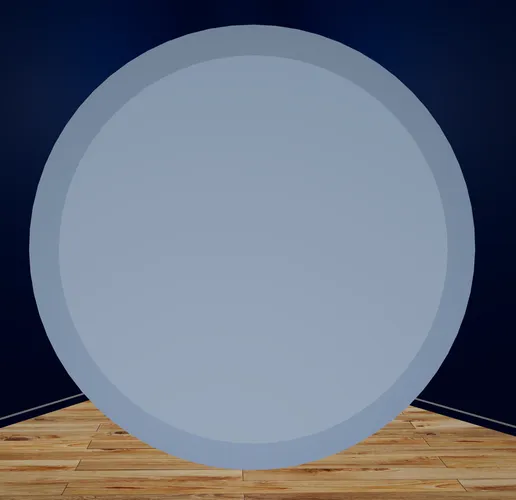
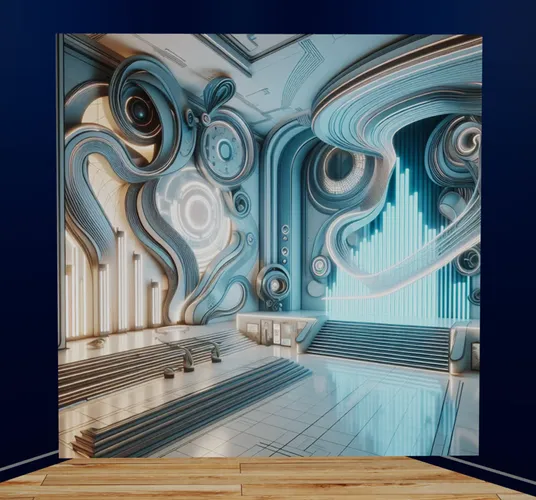
25 return scene26 })27}In fact, since GallaryScene is a composition of Controls, Frames, GalleryLights, Floor, and Walls, I can comment out <app-frames /> and show you what it looks like with just the Controls, GalleryLights, Floor, and Walls
 Screenshot of the Angular Three rewrite with just the Controls, GalleryLights, Floor, and Walls
 Screenshot of the Angular Three rewrite with just the Controls, GalleryLights, Floor, and Walls
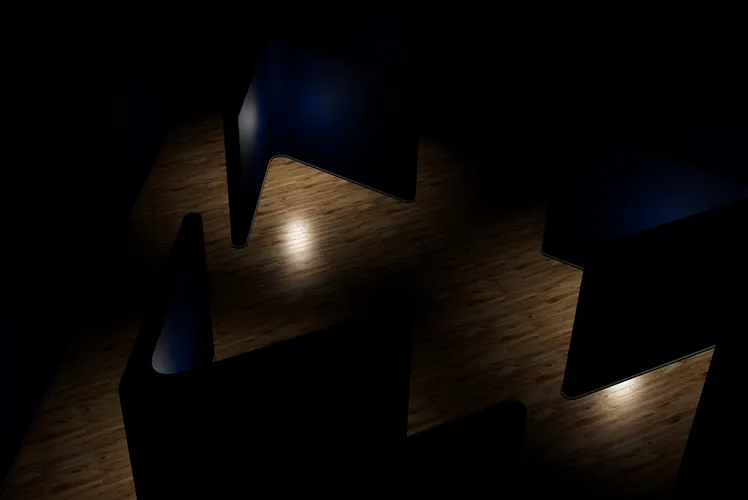
Well, this is also achievable by commenting out the this.createFrames() in the vanilla THREE.js counterpart. But what if you want to see the difference in the lighting setup with and without the base <app-lights />? You can do so very easily by commenting out <app-lights /> in <app-gallery-lights />
 Screenshot of the Angular Three rewrite with just the Controls, GalleryLights (no base Lights), Floor, and Walls
 Screenshot of the Angular Three rewrite with just the Controls, GalleryLights (no base Lights), Floor, and Walls
The Frames
This part consists of 5 image frames based on the artworks() data.
The Frames are created by the createFrames() method in the vanilla THREE.js version. The frames is a Group which contains all 5 individual image frames (1). Then, we iterate over the artworks array to create a frame for each artwork (2). We create the frame by calling createFrame() and then place the frame by calling placeFrame() (3). Finally, we add the frame to the frames group (4).
1frames: Group<Object3DEventMap> = new Group();2
3createFrames ( artworks: Artwork[], cb?: Function ) {4    this.frames.name = 'Frames Group';5    // Angle between frames6    this.angle = ( Math.PI * 2 ) / artworks.length || 5;7
8    const frames = artworks.map( ( artwork, i ) => {9      const f = this.placeFrame( this.createFrame( artwork ), i );10      f.name = `Frame ${i}`;11      return f;12    } );13
14    this.frames.add( ...frames );15
16    this.frames.position.set( 0, 1.6, 0 );17    this.focusFrame( 0 );18
19    return this.frames;20}
Let’s look at the rewrite Angular Three version
First, we use the ngt-group to create the Group that contains all 5 image frames. Our Frames component accepts an Input artworks which is an array of Artwork objects. We use the @for control-flow to iterate over the artworks array to create a Frame for each artwork. We also create a CylinderGeometry that all 5 Frame will share.
1@Component({2  selector: 'app-frames',3  standalone: true,4  template: `5    <ngt-group name="Frames Group" [position]="[0, 1.6, 0]">6      @for (artwork of artworks(); track artwork.id) {7        <app-frame8          [artwork]="artwork"9          [geometry]="geometry"10        />11      }12    </ngt-group>13  `,14  changeDetection: ChangeDetectionStrategy.OnPush,15  schemas: [CUSTOM_ELEMENTS_SCHEMA],16  imports: [Frame],17})18export class Frames {19  artworks = input.required<Artwork[]>()20
21  protected geometry = new CylinderGeometry(1, 0.85, 0.1, 64, 5)22
23  private angle = computed(() => (Math.PI * 2) / this.artworks().length || 5)24}
There are also placeFrame() and focusFrame() which we touch on in later sections.
The frame
Each image frame consists of three parts:
- The Frame itself which is a
Mesh - The image which is a
Meshwith aTexture - The buttons which are
MeshwithTexton them (fromthree-mesh-ui)
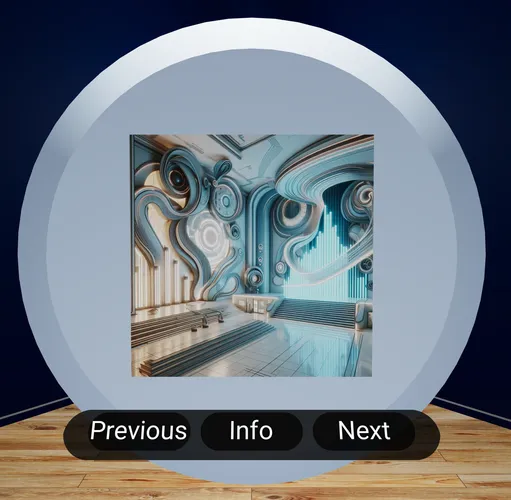 Screenshot a full frame
Surround all parts is a Group
1createFrame(artwork: Artwork) {2 const frame = new Group();3}1<ngt-group #frameGroup></ngt-group>The frame Mesh
 Screenshot the frame only
From the image, you might be able to tell that this is the first part of our Frame component which is the base/frame itself and it is using the CylinderGeometry that we create in the parent Frames component.
Let’s take a look at the code for this part in both versions
The code is removed in part that is not relevant to the frame creation. The Frame is straightforward to create. We create a Mesh with the CylinderGeometry and MeshPhongMaterial and then add it to the frame Group. The geometry is also rotated by 90 degree on the X axis before it is used on the Mesh.
1createFrame ( artwork: Artwork ) {2    this.frameGeometry.rotateX( Math.PI / 2 );3
4    // Create the frame5    const frameMaterial = this.phongMaterial.clone();6    frameMaterial.color.set( "rgb(165, 187, 206)" );7    frameMaterial.needsUpdate = true;8    const frameMesh = new Mesh( this.frameGeometry, frameMaterial );9
10    frameMesh.name = `${artwork.title} frame mesh` || 'frame';11
12    frame.add( frameMesh );13
14    return frame;15}
As straightforward as the vanilla THREE.js version, we use the ngt-mesh element to create the Mesh with the passed in CylinderGeometry and a ngt-mesh-phong-material.
1<ngt-group #frameGroup>2
3    <ngt-mesh4        #frameMesh5        [name]="artwork().title + ' frame mesh'"6        [geometry]="geometry"7        (afterAttach)="onAfterAttach($any(frameMesh))"8    >9        <ngt-mesh-phong-material color="rgb(165, 187, 206)" [needsUpdate]="true" />10    </ngt-mesh>11</ngt-group>
Notice the (afterAttach) event that is used to call the onAfterAttach() method on the frame mesh. This is where we rotate the geometry. In the Angular Three version, we have to use the queueMicrotask() to ensure that the frameMesh is attached to the frameGroup before we rotate the geometry.
1onAfterAttach(frameMesh: Mesh) {2 queueMicrotask(() => {3 frameMesh.geometry.rotateX(Math.PI / 2)4 })5}
afterAttach()is a special event in Angular Three that is triggered when the element is attached to its parent element. This is useful when we need to perform an action on the element after it is attached to the scene graph.
The image Mesh
 Screenshot the image only
If I haven’t bragged already, then these images are captured by commenting out parts of the
Framecomponent template. Thanks to Angular Three.
The code is removed in part that is not relevant to the image creation. The image is a Mesh with a BoxGeometry and a MeshPhongMaterial with a Texture applied to it. The image is then added to the frame Group. The image is also accompanied by a SpotLight that targets the image.
1createFrame ( artwork: Artwork ) {2
3    const canvasGeometry = new BoxGeometry( 1, 1, 0.12 );4
5
6    // Create the canvas material with the texture7    const texture = this.loadersService.loadTexture( artwork.url );8    texture.colorSpace = SRGBColorSpace;9    texture.mapping = UVMapping;10    const canvasMaterial = this.phongMaterial.clone();11    canvasMaterial.name = 'Canvas Material';12    canvasMaterial.map = texture;13
14
15    // Create the canvas mesh16    const canvasMesh = new Mesh( canvasGeometry, canvasMaterial );17    canvasMesh.name = 'Canvas';18
19
20    const light = this.lightsService.createSpotLight();21    light.target = canvasMesh;22    light.position.y = 2;23
24
25    frame.add( canvasMesh, light );26
27 return frame;28}1@Component({2 template: `3 <ngt-group #frameGroup>4 <!--- truncated frame mesh -->5
6
7 <ngt-mesh #canvasMesh name="Canvas">8
9 <ngt-box-geometry *args="[1, 1, 0.12]" />10
11 <ngt-mesh-phong-material name="Canvas material" [map]="artworkTexture()" />12 </ngt-mesh>13
14
15 <ngt-spot-light16 [intensity]="30"17 [distance]="30"18 [angle]="Math.PI / 4"19 [penumbra]="0.5"20 [target]="canvasMesh"21 [position]="[0, 2, 0]"22 />23 </ngt-group>24 `,25 changeDetection: ChangeDetectionStrategy.OnPush,26 schemas: [CUSTOM_ELEMENTS_SCHEMA],27 imports: [NgtArgs, FrameButtons],28})29export class Frame {30 protected Math = Math31
32 geometry = input.required<CylinderGeometry>()33 artwork = input.required<Artwork>()34
35
36 protected artworkTexture = injectNgtsTextureLoader(() => this.artwork().url, {37 onLoad: ([texture]) => {38 texture.colorSpace = SRGBColorSpace39 texture.mapping = UVMapping40 checkUpdate(texture)41 },42 })43}Notice how we can use Template Variable #canvasMesh to reference the Mesh element and assign it to the [target] input on the SpotLight? That is the power of Angular Three declarative approach. Everything that is familiar to Angular developers is available by using Angular Three.
The buttons
 Screenshot of the frame buttons only
A lot is going on here to create the UI Buttons (Previous, Info, Next). These are created via three-mesh-ui library. The main key of this part is that these elements in the Canvas have to be interactive and have event listeners attached to them. This is tricky in THREE.js because the elements do not have DOM events as they’re elements in a Canvas. This is where the Interaction Manager comes in but it is not developer friendly to add interactions to 3D elements.
1createFrame ( artwork: Artwork ) {2
3    const buttons = this.createUI( artwork );4
5
6    frame.add( buttons );7
8    return frame;9}10
11createUI ( artwork: Artwork ) {12
13    const buttonsPanel = this.UIService.createInteractiveButtons( { buttons: this.buttons, id: artwork.id } );14    buttonsPanel.position.x = 0;15    buttonsPanel.position.y = -0.7;16    buttonsPanel.position.z = -0.2;17
18    buttonsPanel.rotateY( Math.PI );19    buttonsPanel.rotateX( -0.55 );20
21    return buttonsPanel;22}23
24createInteractiveButtons ( options: any ) {25    const ops = Object.assign( {}, this.defaultOptions, options );26
27    const container = new ThreeMeshUI.Block(28      {29        justifyContent: 'center',30        contentDirection: 'row-reverse',31        fontFamily: this.FontJSON,32        fontTexture: this.FontImage,33        fontSize: 0.1,34        padding: 0.02,35        borderRadius: 0.11,36        height: 0.2,37        width: options.buttons.length / 2,38      }39    );40    container.name = ops.name;41    this.container = container;42
43
44    ops.buttons.forEach( ( o: any, i: number ) => {45
46      const button = this.createButton( ops.id, o );47      this.container.add( button );48    } );49
50    return container;51};52
53createButton ( id: number, ops?: any ) {54
55    const btn = new ThreeMeshUI.Block( this.buttonOptions );56    btn.name = `Frame ${id} ${ops.name}`;57
58
59    btn.add( new ThreeMeshUI.Text( {60      content: ops.text,61      name: `${ops.name} Text`,62    } ) );63
64
65    // @ts-ignore66    btn.setupState( {67      state: 'selected',68      attributes: this.selectedAttributes,69    } );70
71    // @ts-ignore72    btn.setupState( this.idleStateAttributes );73    // @ts-ignore74    btn.setupState( this.hoveredStateAttributes );75
76
77    btn.position.set( -0.5, 0, 0 );78
79
80    this.interactions.addToInteractions( btn );81    this.interactions.addToColliders( { mesh: btn, name: ops.name, cb: () => { ops.onClick( id ); } } );82    // @ts-ignore83    btn.addEventListener( 'click', () => { ops.onClick( id ); } );84
85    return btn;86}
Things look a little manageable here in the Angular Three version. First, we use extend() to make Block available as ngt-mesh-block and Text available as ngt-mesh-text. Then, everything just happens on the template, even the Event Listener part via a familiar Event Binding syntax (click). Since FrameButtons is a component, it can have Input as well as Outputs so we attach the next, previous, and playInfo outputs to the (click) event on the buttons accordingly.
1import { Block, Text, update } from 'three-mesh-ui'2
3extend({ MeshBlock: Block, MeshText: Text })4
5@Component({6  selector: 'app-frame-buttons',7  standalone: true,8  template: `9
10    <ngt-mesh-block *args="[buttonsPanelArgs]" [position]="[0, -0.7, -0.2]" [rotation]="[0.55, Math.PI, 0]">11
12      @for (button of buttons; track $index) {13
14        <ngt-mesh-block15          *args="[buttonOptions]"16          [name]="'Frame ' + artwork().id + ' ' + button.text + ' Button'"17          [position]="button.position"18
19          (click)="$any($event).object.name === 'MeshUI-Frame' && button.onClick()"20        >21
22          <ngt-mesh-text23            *args="[{ content: button.text, name: 'Frame ' + artwork().id + ' ' + button.text + ' Button Text' }]"24          />25        </ngt-mesh-block>26      }27    </ngt-mesh-block>28  `,29  imports: [NgtArgs],30  schemas: [CUSTOM_ELEMENTS_SCHEMA],31  changeDetection: ChangeDetectionStrategy.OnPush,32})33export class FrameButtons {34  protected Math = Math35
36  artwork = input.required<Artwork>()37  next = output()38  previous = output()39  playInfo = output()40
41  protected buttonOptions = DEFAULT_BUTTON_OPTIONS42  protected buttons = [43    {44      onClick: this.next.emit.bind(this.next),45      text: 'Next',46      position: [-0.75, 0, 0.0],47    },48    {49      onClick: this.playInfo.emit.bind(this.playInfo),50      text: 'Info',51      position: [-0.8, 0.8, -0.1],52    },53    {54      onClick: this.previous.emit.bind(this.previous),55      text: 'Previous',56      position: [0.75, 0, 0],57    },58  ]59  protected buttonsPanelArgs = {60    name: 'Button Panel Container',61    justifyContent: 'center',62    contentDirection: 'row-reverse',63    fontFamily: 'fonts/Roboto-msdf.json',64    fontTexture: 'fonts/Roboto-msdf.png',65    fontSize: 0.1,66    padding: 0.02,67    borderRadius: 0.11,68    height: 0.2,69    width: this.buttons.length / 2,70  }71
72  constructor() {73
74    injectBeforeRender(() => {75      update()76    })77  }78}
You might be wondering what is
(click)="$any($event).object.name === 'MeshUI-Frame' && button.onClick()"? Angular Three provides its own event system out of the box.Blockfromthree-mesh-uicreates an implicitFrameelement as well as aBlockelement so Angular Three’s event system captures two events when we click on theFrameelement: one event forBlock, and one event forFrame. We use$any($event).object.name === 'MeshUI-Frame'as a workaround to ensure that the event is only triggered once.
Other details
We skip a couple of methods like placeFrame(), focusFrame(), and moveFrame(). These methods are used to position the frame relative to the Frames group and to focus on a particular frame at a time. The way we implement this in Angular Three is different than in Vanilla THREE.js, not in the logic themselves but where to put them. In Angular Three, we leverage afterAttach event as a way to ensure the elements are ready before we perform any action on them.
1@Component({2  selector: 'app-frames',3  standalone: true,4  template: `5    <ngt-group6        name="Frames Group" [position]="[0, 1.6, 0]"7
8        (afterAttach)="onFramesGroupAttached($any($event).node)"9        >10      @for (artwork of artworks(); track artwork.id) {11        <app-frame12          [artwork]="artwork"13          [geometry]="geometry"14
15          (frameAttached)="onFrameAttached($event, $index)"16        />17      }18    </ngt-group>19  `,20  changeDetection: ChangeDetectionStrategy.OnPush,21  schemas: [CUSTOM_ELEMENTS_SCHEMA],22  imports: [NgtArgs, Frame],23})24export class Frames {25  artworks = input.required<Artwork[]>()26
27  protected geometry = new CylinderGeometry(1, 0.85, 0.1, 64, 5)28
29  private frames = signal<Group>(null!)30
31
32  onFrameAttached(frame: Group, index: number) {33    frame.rotateY(Math.PI)34    const alpha = index * this.angle()35    const x = Math.sin(alpha) * 7 // 0 - 136    const z = -Math.cos(alpha) * 7 // 0 - 037    frame.position.set(x, 0, z)38    frame.rotation.y = alpha39    frame.userData['originalPosition'] = frame.position.clone()40    checkUpdate(frame)41  }42
43
44 onFramesGroupAttached(frames: Group) {45 this.frames.set(frames)46 // NOTE: we want to run this after all frames are attached47 queueMicrotask(() => {48 const f = frames.children[0]49 this.focusFrame(f)50 })51 }1@Component({2 selector: 'app-frame',3 standalone: true,4 template: `5 <ngt-group6 #frameGroup7
8 (afterAttach)="frameAttached.emit($any(frameGroup))"9 >10 <!-- truncated -->11 </ngt-group>12 `,13 changeDetection: ChangeDetectionStrategy.OnPush,14 schemas: [CUSTOM_ELEMENTS_SCHEMA],15 imports: [NgtArgs, FrameButtons],16})17export class Frame {18 protected Math = Math19
20 geometry = input.required<CylinderGeometry>()21 artwork = input.required<Artwork>()22
23
24 frameAttached = output<Group>()25
26 /* truncated */27}The interactions
Last step is to convert the Next, Previous, and Play Info events over. This is done by emitting the next, previous, and playInfo outputs from the FrameButtons component -> Frame component then handle the events in Frames component.
1@Component({2  selector: 'app-frames',3  standalone: true,4  template: `5    <ngt-group name="Frames Group" [position]="[0, 1.6, 0]" (afterAttach)="onFramesGroupAttached($any($event).node)">6      @for (artwork of artworks(); track artwork.id) {7        <app-frame8          [artwork]="artwork"9          [geometry]="geometry"10          (frameAttached)="onFrameAttached($event, $index)"11
12          (next)="onNext($event)"13          (previous)="onPrevious($event)"14          (playInfo)="onPlayInfo($event)"15        />16      }17    </ngt-group>18  `,19  changeDetection: ChangeDetectionStrategy.OnPush,20  schemas: [CUSTOM_ELEMENTS_SCHEMA],21  imports: [NgtArgs, Frame],22})23export class Frames {24  artworks = input.required<Artwork[]>()25
26  protected geometry = new CylinderGeometry(1, 0.85, 0.1, 64, 5)27
28  private speechClient = inject(SpeechClient)29
30  private frames = signal<Group>(null!)31  private angle = computed(() => (Math.PI * 2) / this.artworks().length || 5)32
33
34  onNext(currentId: number) {35    const currentFrame = this.frames().children[currentId]36    this.resetFramePosition(currentFrame)37
38    // Rotate to Next frame39    const i = currentId < 5 - 1 ? currentId + 1 : 040    this.rotateFrames(72)41    this.focusFrame(this.frames().children[i])42  }43
44
45  onPrevious(currentId: number) {46    const currentFrame = this.frames().children[currentId]47    this.resetFramePosition(currentFrame)48
49    // Rotate to Previous50    const i = currentId === 0 ? 5 - 1 : currentId - 151    this.rotateFrames(-72)52    this.focusFrame(this.frames().children[i])53  }54
55
56  onPlayInfo(artwork: Artwork) {57    const text = artwork.description || artwork.title58    if (text) {59      void this.speechClient.speak(text)60    }61  }62
63  onFrameAttached(frame: Group, index: number) {64    frame.rotateY(Math.PI)65    const alpha = index * this.angle()66    const x = Math.sin(alpha) * 7 // 0 - 167    const z = -Math.cos(alpha) * 7 // 0 - 068    frame.position.set(x, 0, z)69    frame.rotation.y = alpha70    frame.userData['originalPosition'] = frame.position.clone()71    checkUpdate(frame)72  }73
74  onFramesGroupAttached(frames: Group) {75    this.frames.set(frames)76    // NOTE: we want to run this after all frames are attached77    queueMicrotask(() => {78      const f = frames.children[0]79      this.focusFrame(f)80    })81  }82
83  private focusFrame(frame: Object3D) {84    const x = (frame.position.x / 7) * 485    const z = (frame.position.z / 7) * 486    const p = new Vector3(x, frame.position.y, z)87    this.moveFrame(frame, p)88  }89
90  private moveFrame(frame: Object3D, position: Vector3) {91    animate({92      from: frame.position,93      to: position,94      duration: 2500,95      ease: easeInOut,96      onUpdate: (latest) => {97        frame.position.x = latest.x98        frame.position.y = latest.y99        frame.position.z = latest.z100      },101      onComplete: () => {102        checkUpdate(frame)103      },104    })105  }106
107  private resetFramePosition(frame: Object3D) {108    const position = frame.userData['originalPosition']109    this.moveFrame(frame, position)110  }111
112  private rotateFrames(angle: number = 72) {113    // angle between frames and the current group rotation114    const y = MathUtils.degToRad(angle) + this.frames().rotation.y115    animate({116      from: this.frames().rotation.y,117      to: y,118      duration: 1000,119      ease: easeInOut,120      onUpdate: (latest) => (this.frames().rotation.y = latest),121    })122  }123}
And voila, the application is converted fully to Angular Three. Here’s the GIF of the running application again.
Animated gif of the Angular WebXR application
Github:
Conclusion
In this blog post, we have successfully converted a Vanilla THREE.js application to Angular Three. We have seen how Angular Three can help us to write cleaner and more maintainable code by leveraging Angular’s template syntax and TypeScript. We have also seen how Angular Three can help us to manage the complexity of a 3D application by providing a declarative way to create and manage 3D elements.
The process is super fun for me personally and I hope you enjoy reading it as much as I enjoy writing it. If you have any questions or feedback, feel free to reach out to me on Twitter.
Have fun coding!