In Angular, Structural Directives are directives that can alter the DOM layout by dynamically adding or removing elements. Up until Angular 17, we are familiar with the common directives like *ngIf and *ngFor. However, these directives are replaced by built-in control flows blocks, but structural directive concept itself is here-to-stay. With that being said, this blog post aims to take your understanding of Structural Directives to the next level and show how they are more than just control flows.
Context
Before we dive in, I should layout some context
First of all, I’m the maintainer of angular-three, a THREE.js integration for Angular. The example in this blog post is taken from a feature in angular-three that enables one of the most important building blocks of THREE.js
Secondly, angular-three has gone through several iterations with different implementations:
- Wrappers with Components and Directives
- Proxied constructors with Directives
- Custom Renderer.
Although a bit old, you can read more about the
Rendererconcept in this blog post by Victor Savkin
At the moment, angular-three is a custom Renderer which allows me to own the Angular Template where the angular-three renderer is in control.
Next, the blog post is indeed about Structural Directives but to get to the point, we’d need to make several round trips to know how Angular works under the hood. So, stay with me, it’ll be worth it 🤞
Last but not least, this blog post assumes some basic understanding of Angular in general, and specifically Structural Directives. If the summary at the beginning of the blog post doesn’t make you start envisioning some <div *ngIf=""></div> in your head, I’d highly recommend you checking out the official documentation on the matter before continue on.
Some basic understanding of WebGL or THREE.js would allow the example to stick with you easier but it is definitely not required.
The important building blocks of THREE.js
THREE.js is an abstraction over WebGL and is mainly used to build 3D applications on the web. Here’s a complete snippet of a simple THREE.js application
import * as THREE from "three";
const scene = new THREE.Scene();const camera = new THREE.PerspectiveCamera( 75, window.innerWidth / window.innerHeight, 0.1, 1000,);
const renderer = new THREE.WebGLRenderer();renderer.setSize(window.innerWidth, window.innerHeight);document.body.appendChild(renderer.domElement);
const geometry = new THREE.BoxGeometry(1, 1, 1);const material = new THREE.MeshBasicMaterial({ color: 0x00ff00 });const cube = new THREE.Mesh(geometry, material);scene.add(cube);
camera.position.z = 5;
function animate() { requestAnimationFrame(animate);
cube.rotation.x += 0.01; cube.rotation.y += 0.01;
renderer.render(scene, camera);}
animate();Here, we can see THREE.js needs to have:
- A
Scene, aCamera, and aRenderer: these are used to actually render our Scene Graph in an animation loop. - Objects that can go onto the
Scene: in this case, it is aMeshwith aBoxGeometryand aMeshBasicMaterial
We will not dive too deep into THREE.js in this blog post but we need at least this basic understanding to digest the next sections. From the above snippet, let’s take a closer look at the following:
const geometry = new THREE.BoxGeometry(1, 1, 1);const material = new THREE.MeshBasicMaterial({ color: 0x00ff00 });const cube = new THREE.Mesh(geometry, material);- Geometries in THREE.js accept positional parameters (i.e: construction arguments). These parameters are sent to the GPU to build up the vertices that determine the shape of this object.
new THREE.BoxGeometry(1, 1, 1)tells the GPU to build a cube with[width: 1, height: 1, depth: 1]. - Materials in THREE.js accept object paramters. These parameters are sent to the shader on every frame so they are safe to be dynamically updated anytime.
const material = new THREE.MeshBasicMaterial({ color: 0x00ff00 });// is pretty much the same asconst material = new THREE.MeshBasicMaterial();material.color.setHex(0x00ff00);
Next, let’s talk about angular-three
How would this look like in Angular?
In angular-three, the Scene, Camera, and Renderer are taken care of by a single top-level component called ngt-canvas. The objects, on the other hand, are the developers’ responsibility (and that’s where the fun is).
For the above THREE.js example, here’s how it’d partially look like in angular-three
<ngt-mesh> <!-- notice no construction arguments for now --> <ngt-box-geometry /> <!-- notice no parameters for now --> <ngt-mesh-basic-material /></ngt-mesh>This translates into the following code in THREE.js:
const mesh = new THREE.Mesh();scene.add(mesh);
const geometry = new THREE.BoxGeometry();mesh.geometry = geometry;
const material = new THREE.MeshBasicMaterial();mesh.material = material;We’re close! The BoxGeometry and MeshBasicMaterial need some parameters though. Before we dive into that, let’s take a side-track and look at how Angular Renderer works roughly.
How does Angular Renderer work (roughly)?
Angular Renderer is responsible for understanding the elements that the developers put on the template. Considering the following template and its compiled version
<div> <span>Child</span> <app-child-cmp /></div>_AppComponent.ɵcmp = /* @__PURE__ */ i0.ɵɵdefineComponent({ type: _AppComponent, selectors: [["app-root"]], standalone: true, features: [i0.ɵɵStandaloneFeature], decls: 4, vars: 0, template: function AppComponent_Template(rf, ctx) { if (rf & 1) { i0.ɵɵelementStart(0, "div")(1, "span"); i0.ɵɵtext(2, "Child"); i0.ɵɵelementEnd(); i0.ɵɵelement(3, "app-child-cmp"); i0.ɵɵelementEnd(); } }, dependencies: [ChildCmp], encapsulation: 2 });The Compiled tab shows how Angular compiles our AppComponent. The HTML template has been compiled into a AppComponent_Template function. In the compiled template function, we see the Template Instructions that Angular Core generates do not have any knowledge that a div is an HTMLDivElement, a span is an HTMLSpanElement, and so on. That is the job of the underlying platform’s renderer (that implements Renderer2).
By default, an Angular CLI application is bootstraped by @angular/platform-browser with DefaultDomRenderer being the default Renderer2. With this in mind, the elementStart instruction will eventually invoke Renderer.createElement() method and this is the earliest point in time where an HTMLDivElement is instantiated.
With that out of the way, let’s take a closer look at the first parameter of the compiled template function, rf. rf stands for RenderFlags, which has 2 values Create and Update.
rf & 1check is when the component is inCreatephase. No bindings happen in this phase.rf & 2check is when the component is inUpdatephase. Bindings happen in this phase. Upon Change Detection’s tick, the template function is re-invoked withRenderFlags.Updateas the value forrfwhich satisfies therf & 2check. Consequently, this re-invokes the Template Instructions responsible for the bindings on our template.
Additionally, let’s add some bindings to our template.
<div> <!-- 👇 attribute binding --> <span data-dummy="chau">Child</span> <!-- 👇 property binding --> <app-child-cmp [foo]="text" /></div> _AppComponent.ɵcmp = /* @__PURE__ */ i0.ɵɵdefineComponent({ type: _AppComponent, selectors: [["app-root"]], standalone: true, features: [i0.ɵɵStandaloneFeature], decls: 4, vars: 1, // 👇 new "consts" array to store constants on the template consts: [["data-dummy", "chau"], [3, "foo"]], template: function AppComponent_Template(rf, ctx) { if (rf & 1) { // 👇 this call for "span" now accepts a new argument "0" i0.ɵɵelementStart(0, "div")(1, "span", 0); i0.ɵɵtext(2, "Child"); i0.ɵɵelementEnd(); // 👇 notice this "3" index i0.ɵɵelement(3, "app-child-cmp", 1); i0.ɵɵelementEnd(); } // 👇 Update phase check if (rf & 2) { // 👇 notice this "3" index i0.ɵɵadvance(3); // 👇 new "property" instruction i0.ɵɵproperty("foo", ctx.text); } }, dependencies: [ChildCmp], encapsulation: 2 });By adding an Attribute Binding and a Property Binding to our template, the compiled template function has changed quite a bit. Let’s parse through the changes.
Attribute Binding isn’t technically a correct term because there’s no “binding” with Attributes since they are static.
- A new
constsarray is generated. Notice how ourdata-dummy=chaubecomes["data-dummy", "chau"]and how it is in the0position of theconstsarray.constsholds more information than just Attribute Bindings but we will not get into that in this blog post. elementStartcall for"span"is invoked with an additional argument0. Notice how this is the same index as thedata-dummy=chauattribute in theconstsarray. This means that Angular is able to set the attributedata-dummyto theHTMLSpanElement, at the time the element is instantiated, during theCreatephase.- New instructions,
advanceandproperty, are generated in theUpdatephase.advancetells Angular to go to theNodewith this index (i.e:3)propertyis responsible for Property Binding. Here,propertyis invoked with"foo"andctx.textwherefoois the name of ourChildCmpInput andctx.textisAppComponent.textfield.
An important point to note is that property instruction is part of the Update phase which means that Property Binding does not happen until the Update phase. To many Angular developers, this is commonly known as “when the Change Detection runs and updates the template’s bindings”. As a side note, we can connect this knowledge back to “When is an Input resolved in Angular component?”, it actually makes more sense now, doesn’t it?
@Component({ selector: "my-cmp",})export class MyCmp { @Input() foo = "initial";
constructor() { console.log(this.foo); // logs "initial" }
ngOnInit() { console.log(this.foo); // logs "from app component" }}
@Component({ template: ` <my-cmp [foo]="'from app component'" /> `,})export class AppCmp {}So what is the take away here?
Angular creates the elements before Property Bindings has the chance to be set on the elements. And Attribute Bindings
only work with string values so they are limited.
Apply what we know to angular-three
Let’s bring back our angular-three template that creates a Mesh
<ngt-mesh> <ngt-box-geometry /> <ngt-mesh-basic-material /></ngt-mesh>As we learned above, MeshBasicMaterial parameters can be safely set after the material is created. Hence,
we can safely rely on Property Bindings to set parameters for MeshBasicMaterial.
<ngt-mesh> <ngt-box-geometry /> <ngt-mesh-basic-material [color]="materialColor" /></ngt-mesh>This translates roughly to the following THREE.js code
/* removed for brevity */
const material = new THREE.MeshBasicMaterial();mesh.material = material;
// sometimes in the futurematerial.color.setHex(materialColor);Now, this leaves us new THREE.BoxGeometry(1, 1, 1) and this is the problem considering how THREE.js expects Geometries to behave
How do we pass an expression (yes, it can be dynamic and cannot be a static string value) at the time that the element is created?
In other words, what we want to achieve is to defer the instantiation of <ngt-box-geometry /> declaratively on the template. Anything comes to mind?
Not yet…OK, let’s rephrase that a little differently this time. How can we wait for some expression to be evaluated before we start rendering <ngt-box-geometry />? (keywords: wait, expression, evaluated, start rendering)
Yes, this phrasing reminds us of Structural Directives. These directives evaluate some expressions and then createEmbeddedView dynamically afterwards. At this point, we know that we want to use Structural Directive to solve the problem, but how though?
Whew, we are finally talking about Structural Directives. I truly hope I haven’t bored you yet 🤞
Structural Directive for Construction Arguments
To model passing in construction arguments to THREE.js entities, angular-three provides a directive called NgtArgs and it is used like this
<!-- new THREE.BoxGeometry(1, 1, 1) --><ngt-box-geometry *args="[1, 1, 1]" /><!-- new OrbitControls(camera, domElement) --><ngt-orbit-controls *args="[camera, domElement]" />Why don’t we re-build NgtArgs to see how it works?
@Directive({ selector: '[args]', standalone: true})export class NgtArgs { @Input() set args(args: any[]) { // let's assume args is always valid for now if (this.embeddedViewRef) { // if args changes, we will need to reconstruct the THREE.js entities this.embeddedViewRef.destroy(); } // TODO: ?? this.embeddedViewRef = this.vcr.createEmbeddedView(this.templateRef); } private vcr = inject(ViewContainerRef); private templateRef = inject(TemplateRef); private embeddedViewRef?: EmbeddedViewRef;}<ngt-box-geometry *args="[1, 1, 1]" />Notice that TODO? Yes, we are able to defer the rendering of ngt-box-geometry until we have [1, 1, 1] available in NgtArgs but we haven’t
done anything with [1, 1, 1] yet. This brings up another problem: How can we access this args in our element instantiation logic, aka the renderer?
In order to understand the next part, let’s look at a simplified version of Renderer.createElement()
// Our custom rendererexport class CustomRenderer implements Renderer2 { createElement(name: string, namespace?: string | null | undefined) { // name will be `ngt-box-geometry` when Angular tries rendering `ngt-box-geometry` const threeTarget = getThreeTargetFromName(name); // this will return the actual BoxGeometry class from THREE.js if (threeTarget) { // 👇 we need to pass the args, [1, 1, 1], here const node = new threeTarget(); // this is where we instantiate the BoxGeometry. } }}This is a very tricky problem because we can see that createElement does not give us a whole lot of information surrounding the element being created beside its name. To solve this, it’s important to understand how Angular treats Structural Directives, and to comprehend the sequence in which the Angular Renderer operates in relation to the Structural Directives. It is also important to understand this process in conjunction with the dynamically generated EmbeddedViewRef.
Structural Directive and Comment node
Once again, here’s our template with *args structural directive
<ngt-box-geometry *args="[1, 1, 1]" />For folks that are not aware, *args is the short-hand syntax for Structural Directive. The * syntax is expanded in to the following long form
<ng-template [args]="[1, 1, 1]"> <ngt-box-geometry /></ng-template>Well well, what have we here? Remember how we inject(TemplateRef) in our NgtArgs directive? In the long-form, we can easily see where the TemplateRef comes from. Our NgtArgs directive is attached on an ng-template element making the instance of TemplateRef available to NgtArgs directive.
Next, let’s check the compiled code
function AppComponent_ngt_box_geometry_0_Template(rf, ctx) { if (rf & 1) { i0.ɵɵelement(0, "ngt-box-geometry"); }}
function AppComponent_Template(rf, ctx) { if (rf & 1) { i0.ɵɵtemplate( 0, AppComponent_ngt_box_geometry_0_Template, 1, 0, "ngt-box-geometry", 0, ); } if (rf & 2) { i0.ɵɵproperty("args", [1, 1, 1]); }}Woohoo, new instruction! The template instruction is responsible for handling ng-template. Internally, Angular creates a Comment in place of the ng-template. Additionally, Angular also creates an ElementInjector associated with the Comment node IF there is at least one directive attached on the ng-template, and in our case, that directive is NgtArgs. This also means that
if we can get a hold of that Comment node, we technically can access the NgtArgs directive instance that is attached on that Comment node.
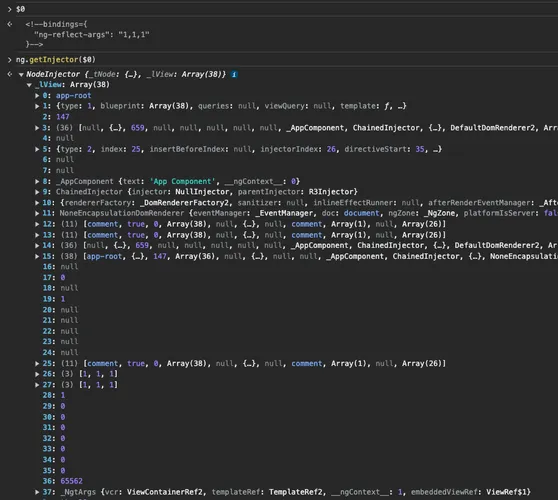 A screenshot of the Comment node and its Injector (NgtArgs instance is visible at the bottom)
Another important point is Angular creates the Comment node first, then the NgtArgs directive will be instantiated with the property instruction, in the Update phase. Now, how do we track the created Comment? Our Custom Renderer will do that.
Tracking the Comment nodes
To create a Comment node, Angular Core invokes Renderer#createComment method and since we’re using a Custom Renderer, we are able to intercept this call to track the created Comment. Here’s the snippet of createComment
createComment(value: string) { // 👇 the platform Renderer; in our case, this would be the default DomRenderer from `platform-browser` return this.platformRenderer.createComment(value);}We can modify createComment like this:
createComment(value: string) { const commentNode = this.platformRenderer.createComment(value); // Do something with the commentNode before returning it return commentNode;}Access the Injector on the Comment
Tracking the Comment alone will not be enough, we need the Injector which allows us to access the NgtArgs instance. Let’s go back to NgtArgs and add some code
@Directive({ selector: "[args]", standalone: true,})export class NgtArgs { @Input() set args(args: any[]) { // let's assume args is always valid for now if (this.embeddedViewRef) { // if args changes, we will need to reconstruct the THREE.js entities this.embeddedViewRef.destroy(); } this.embeddedViewRef = this.vcr.createEmbeddedView(this.templateRef); } private vcr = inject(ViewContainerRef); private templateRef = inject(TemplateRef); private embeddedViewRef?: EmbeddedViewRef;
constructor() { // let's log the ViewContainerRef to see what we have on here (you can log other stuffs too) console.log(this.vcr); }} 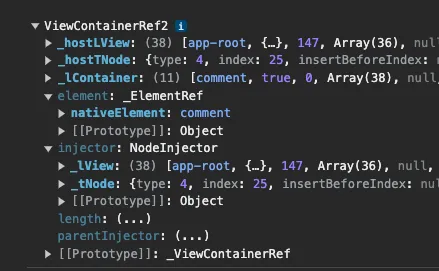 A screenshot of the ViewContainerRef on the directive
And voila, we found our Injector. The ViewContainerRef also contains the element which is the Comment node that the Renderer created. Great!
ViewContainerRefcontains all the information we need but we can injectElementRefandInjectorexplicitly.
So what do we know so far?
- The
Commentwill be created before theNgtArgsdirective is instantiated, which means thatNgtArgsconstructor runs after theCommentis created ViewContainerRefcontains theInjectoralong with theComment.
Then what can we do?
- We can attach some arbitrary function on the
Commentnode. - We then get the instance of the
Commentnode using theViewContainerRefand invoke this function in our directive. At this point, we can pass anything we want to our Renderer.
There are different approaches to do this but this is what Angular Three is doing at the moment.
Let’s adjust createComment as well as NgtArgs
@Injectable()export class CustomRendererFactory implements RendererFactory2 { private platformRendererFactory = inject(RendererFactory2, { skipSelf: true }); // 👇 we create an Injector[] in the Factory because we want to keep a single array for all Renderers private comments: Injector[] = []; createRenderer(hostElement: any, type: RendererType2 | null) { const platformRenderer = this.platformRendererFactory.createRenderer(hostElement, type); // 👇 pass the Injector[] down to the Renderer return new CustomRenderer(platformRenderer, this.comments); }}export class CustomRenderer implements Renderer2 { constructor(private platformRenderer: Renderer2, private comments: Injector[]) {} createComment(value: string) { const commentNode = this.platformRenderer.createComment(value); // 👇 We attach a function that accepts an Injector and push that injector to our tracked array. commentNode['__TRACK_FN__'] = (injector: Injector) => { this.comments.push(injector); } return commentNode; }}@Directive({ selector: '[args]', standalone: true})export class NgtArgs { injectedArgs?: any[]; @Input() set args(args: any[]) { if (this.embeddedViewRef) { this.embeddedViewRef.destroy(); } // 👇 we also need to expose the "args" by assigning it to a public field "injectedArgs" this.injectedArgs = args; this.embeddedViewRef = this.vcr.createEmbeddedView(this.templateRef); } private vcr = inject(ViewContainerRef); private templateRef = inject(TemplateRef); private embeddedViewRef?: EmbeddedViewRef; constructor() { const commentNode = this.vcr.element.nativeElement; /* * - Get the Comment * - Invoke the function * - Delete the function */ if (commentNode['__TRACK_FN__']) { commentNode['__TRACK_FN__'](this.vcr.injector); delete commentNode['__TRACK_FN__']; } // 👆 This approach also allows us to ignore other directives like ngIf, ngFor etc... that we don't need to track }}Alright, now we have the Injector[] that we’re tracking, we can adjust Renderer#createElement() to make use of the Injector
export class CustomRenderer implements Renderer2 { createElement(name: string, namespace?: string | null | undefined) { // name will be `ngt-box-geometry` when Angular tries rendering `ngt-box-geometry` const threeTarget = getThreeTargetFromName(name); // this will return the actual BoxGeometry class from THREE.js if (threeTarget) { let args: any[] = []; // we'll loop over the `Injector` array and attempt to inject NgtArgs for (const commentInjector of this.comments) { const ngtArgs = commentInjector.get(NgtArgs, null); if (!ngtArgs) continue; const injectedArgs = ngtArgs.injectedArgs; if (!injectedArgs) continue; args = injectedArgs; // break as soon as we find injectedArgs break; } const node = new threeTarget(...args); // this is where we instantiate the BoxGeometry. } }}That is how we inject data (or constructor arguments) to createElement, using Structural Directive.
Angular Three implementation is a lot more involved with performance as well as validation. The implementation in this blog post is just to give the readers the idea of manipulating Structural Directives
Conclusion
In this blog post, we’ve explored a niche, yet technical, use-case of using Structural Directive to defer (not @defer 😛) the instantiation
of some element on the template. We’ve learned that Structural Directives are much more than show and hide elements. Additionally, we’ve also learned
about different RenderFlags that Angular Core implements as well as some Template Instructions and their purposes. Last but not least, we’ve also learned
about ng-template and the Comment node along with all the surrounding technical details.
I hope I was able to provide a different perspective for Structural Directive, and an in-depth guide as to how Structural Directive works. After all, I hope you were able to learn something new and have fun learning it. See y’all in the next blog post.
Acknowledgement
I humbly thank all these beautiful wonderful people for reviewing this blog post